Universal Concepts
Tying Knots That Work for Horses
Written by Heather Smith Thomas
This article originally appeared in Eclectic Horseman Issue No.71
There are several knots that every horseman should know how to tie—that are useful when working with horses. There are times you need a knot that will never work loose, and other times you need one that can be untied easily and quickly, even if the horse has pulled back on the rope. Sometimes you need a slipknot, and other times you want a knot that will never slip or tighten up. For your own safety and the safety of your horse, know how to tie the right kind of knot for each situation.
The easiest way to figure out how to make a certain knot is to practice; use a halter rope, or even a piece of baling twine or a shoelace, and practice making the knots. It’s often easiest to envision the steps and figure them out if you are using a rope or a twine to try to make the actual knot.
OVERHAND KNOT – This is the simplest knot of all—the one you make first when tying your shoes (before you do the bow). The overhand knot is sometimes the first step in forming a more complex knot.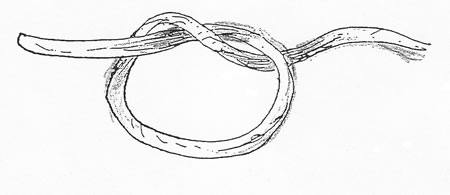
SQUARE KNOT – This is often the best knot to use when tying two ropes or twines together, when you don’t want the knot to slip or come undone—as when tying a broken rope back together or tying a rope or piece of baling twine around a gate and gate post to keep the gate shut. A square knot is very simple: two overhand knots, one on top of the other, but the second one in reverse direction. Before it is pulled tight, the square knot looks like two closed loops leading in opposite directions and linked together. 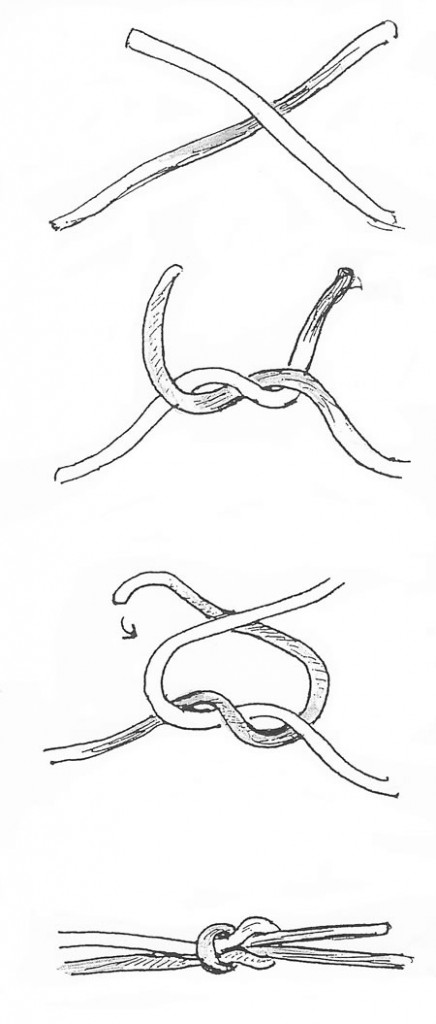
A properly tied square knot won’t slip if the ropes or twines being tied together are of similar size and not too slippery. Make sure you don’t tie a “granny knot,” however (two overhand knots tied in the same direction). It will slip when pulled on and is not a dependable knot if you need it to hold securely.
WEAVER’S KNOT (FISH-LINE KNOT) – If you are tying two ropes of vastly different diameter together (or ropes that are very slippery), a square knot may not hold. In this situation you can use a fish-line knot, like you’d use to tie a leader to a fish-line. Make a bend in the larger diameter rope and thread the smaller rope through and then around it, coming back out under itself. Then pull everything tight. Or, make a bend in the larger rope, put the smaller one through it, around one side, under the other side and back over itself, then tucking under the bend of the larger rope. When you pull everything tight, these knots will hold, and secure the two ropes together.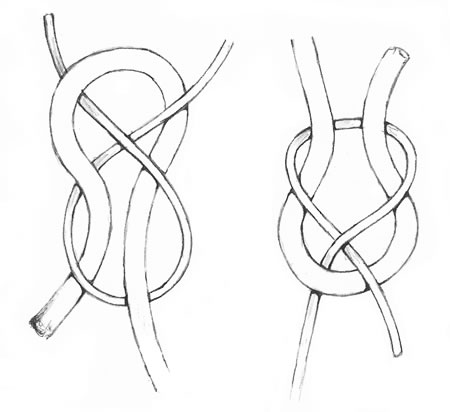
MANGER TIE – This quick-release knot is frequently used when tying a horse to a post or a fence rail. Also called a reefers knot or a bowknot, it is a good non-slip knot (like a square knot) but has the advantage of being more easily untied when it has been pulled tight—such as when a horse has pulled back on the rope.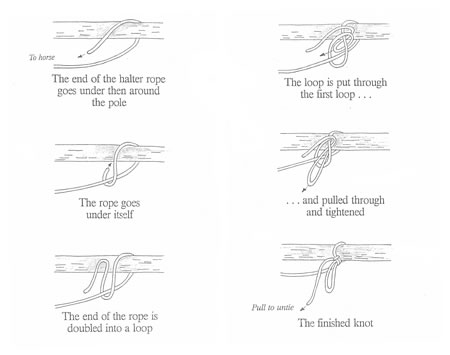
To tie this quick-release knot, start by putting the working end of the rope around the post or pole (with the working end coming out over the top of the pole). Then bring the end of the rope under the part that’s coming away from the post or pole, and double it into a loop to put through the first loop—and pull until the knot is tight. The free end of the rope that comes out from the knot is what you’ll pull on to untie it.
If a horse nibbles on his rope when tied, you can keep him from pulling on the free end (and untying himself) by running the free end down through the loop. But then you must pull the free end up out of the loop before you can untie it by pulling on it.
BOWLINE – This is a good non-slip knot and one of the best to use if you ever have to tie a rope around a horse’s neck—without danger of it tightening up when the rope is pulled. This knot is also fairly easy to untie.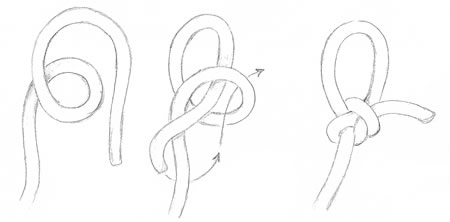
Position the rope so the standing part (long end) is to your left, and the working end to your right. Form a right-hand loop by passing the working end over the long part. Secure the loop by putting the place where the rope crosses between your thumb and index finger of your left hand. Insert the working end of the rope into the loop from the back. Then cross the working end over the top of the standing part and wrap it around the back of the standing part. Re-insert the working end into the loop from the front. Hold the working end and the right hand part of the loop in your right hand, and the standing part of the rope in your left hand. Pull it to shape and secure the knot. The size of the loop (the portion going around the horse’s neck or body, or fence post or through a tie ring) will depend on the amount of working end that you originally allowed for.
An easy way to remember how to tie a bowline is the rabbit and tree story. The first loop is a rabbit hole; the standing part of the rope is a tree, and the working end of the rope is a rabbit. The rabbit comes out of the hole, runs around the tree and goes back down the hole.
CLOVE HITCH – This is a simple wrap around a pole, created by putting the rope once around the pole (going over itself to start a second loop) and poking the working end of the rope under itself as you bring it around to complete that second loop. This knot should only be used to go around something a horse cannot pull off (a pole fastened to the far side of the fence posts, or a pipe fence rail) and isn’t quite as easy to untie if it gets pulled hard. But it can be very handy when used in conjunction with an easy-untie knot, since it keeps the rope from sliding along the pole or pipe, or sliding down a slippery tree.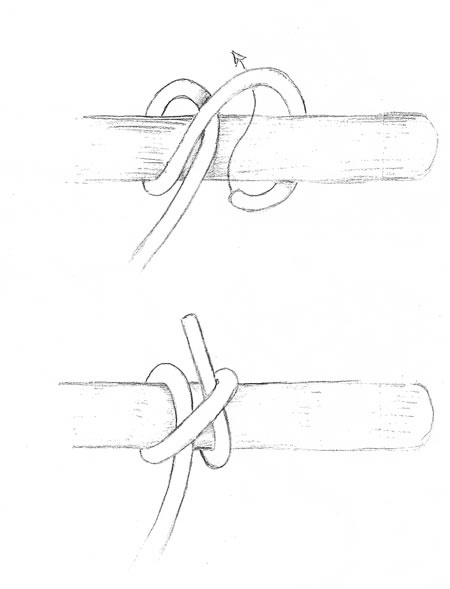
To make it easier to untie, combine it with a knot like a bowline. First tie a clove hitch around the pole to keep the rope from sliding. Then take the two ends that are left (the working end and the part that goes to the horse) and tie a bowline with those. Since the bowline is a non-slip knot, it won’t tighten up if the horse pulls on it, and will be easy to untie.
Another way to use a clove hitch is to make the simple clove hitch and then bend the working end of it back through the rope. Then a quick pull on the working end will undo the knot.
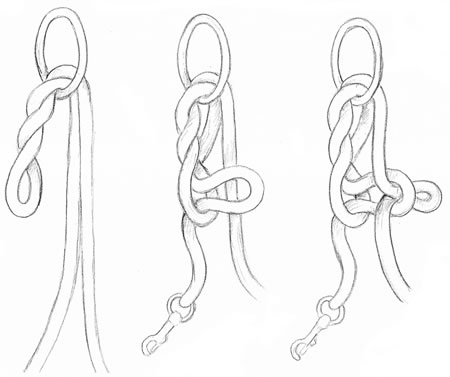
RING KNOT – This is a good knot to use for tying a horse to a ring of any kind. Twist the loop in the rope a few times and put the twisted loop through the ring. Then a loop (in the end going to the horse) can be put through the loop created by the twists, creating a second loop. A loop is then made in the working end of the rope, to put through that loop, leaving a tail on the working end of the rope that can be pulled for untying.
This makes a secure tie that won’t tighten up very much if a horse pulls on it. It also has the advantage of quick and total release if you pull on the tail end. A quick jerk, and the knot comes free and the rope falls out of the ring. Thus you only need one hand to undo it, and never need to let go of the rope end to pass or retrieve it through the ring.
DOUBLE HALF HITCH – This knot is quick and easy, acts like a slipknot, and is a handy way to secure a rope to something in a hurry. Position the standing part of the rope to your left, and take the working end in your right hand. Pass the working end over the rail or around the post. Bring it over the standing part of the rope, under it, then insert it into the loop (the loop around the post) from the bottom. Repeat this step to form the second half of the hitch.
QUICK-RELEASE TIE – A properly tied quick-release knot allows you to pull on the end of the rope to undo the knot, no matter how tight the knot has been pulled. For a quick, safe and easy knot for tying a horse, put a loop of the rope around the post, through the tie ring (or inner tube, or whatever you are tying to). The loop you put around the post or through the ring should then be twisted a couple of times. This twisting is what keeps the knot from getting pulled so tight it would be hard to undo. The twist makes a little space between the various parts of the rope, so there will be some flexibility when you have to loosen the knot. The loop of rope going toward the horse is then pulled through the loop that has been twisted. For safety, always do this with your fingertips, and not with your whole hand—so that if the horse set back at that point, your hand would not be caught in the loop. NEVER put your hand or any part of your body through a loop in a halter rope.
Pull the second loop through the first loop. Then put one or two fingers through that second loop to grab a piece of the rope that is attached to the post or tie ring. That piece is pulled through the loop, and the section of rope that goes to the horse is tightened to produce the final knot. This kind of knot is easy to untie by pulling on the loose end of the rope. The horse can be released quickly and easily in an emergency, even if the knot has become very tight.
This type of knot is best to use if you don’t leave the horse alone without supervision, since he may be able to untie himself by nibbling and pulling on the loose end of the rope. You can thwart this by putting the free end of the rope through the last loop you created, but then it can’t be undone as fast in an emergency. You must first take the end of the rope out of the loop before you can pull the knot loose.
HONDA KNOT – Sometimes you need a small, secure loop in the end of a rope, to run the other end through to create a bigger slip loop, such as in a lariat. An easy way to do this is to first make a simple overhand knot, leaving at least 6 inches of free end. Run the free end around the standing part of the rope (to create the small loop at the end of your long rope) and back through the overhand knot. Pull everything tight, and you have a neat little loop to run the other end of the rope through.
This article originally appeared in Eclectic Horseman Issue No.71