Written by Wendy Murdoch
This article originally appeared in Eclectic Horseman Issue No.28
“We cannot monitor the horse’s understanding of our communications, we cannot evaluate his physical progress in balance and suppleness or engagement and collection without moving on precisely defined patterns…. Of all the patterns available, none is more important than the circle when riding on a single track.” Charles de Kunffy The Athletic Development of the Dressage Horse.
“A circle is a defined, even, geometric figure. The size of the circles vary as the horse progresses to different levels of training and competition.” Dressage Terms Defined Eleanor Russell and Sandra Pearson- Adams.
Did you sleep through high school geometry?
Circular shapes are all around us. They exist throughout nature. We drive our cars through cloverleaf exits off the highway. Roller coasters do loops. The pioneers “circled the wagons” to defend against the Indians. Cheerios, donuts and hamburgers are circular except for the famous square burgers. Your water glass leaves a “ring” on the table when it sweats.
When familiar circular shapes are “out of round,” we notice it immediately. When you get a flat tire on your car it is obvious that the tire is no longer round. Often people joke that the tire is only flat on one side, but either way it will not roll. Unconsciously, we are highly sensitive to the difference between round, oval, egg-shaped, octagonal and square. So what is it about a circle that is so important and how does this apply in riding?
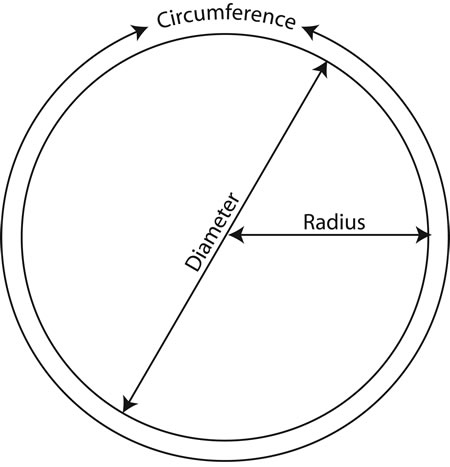
A circle is the simplest geometric shape there is and it is the most easily reproducible (except perhaps from your horse’s back). A circle is defined as “a curved line surrounding a center point, every point of the line being an equal distance from the center point.” From any point on the line of the circle the distance to the center is equal to every other point on the line of the circle.
A straight line drawn from the center of a circle to its edge is called the radius. Like the spoke on a bicycle wheel, the radius is always half the length of the diameter of a circle. The diameter is the length of a straight line going across the circle through the center point, from one side of the circle to the other. The circumference of a circle is the distance around the circle. It is the circle’s perimeter. The formula for circumference is: C = πd where d is the circle’s diameter and π (pi) is 3.14 (approximately). Therefore, a 15-foot circle has a circumference (C=15×3.14) of 47.1 feet!
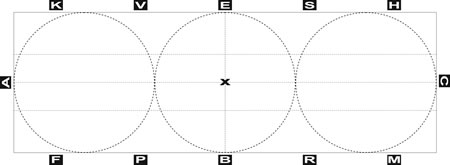
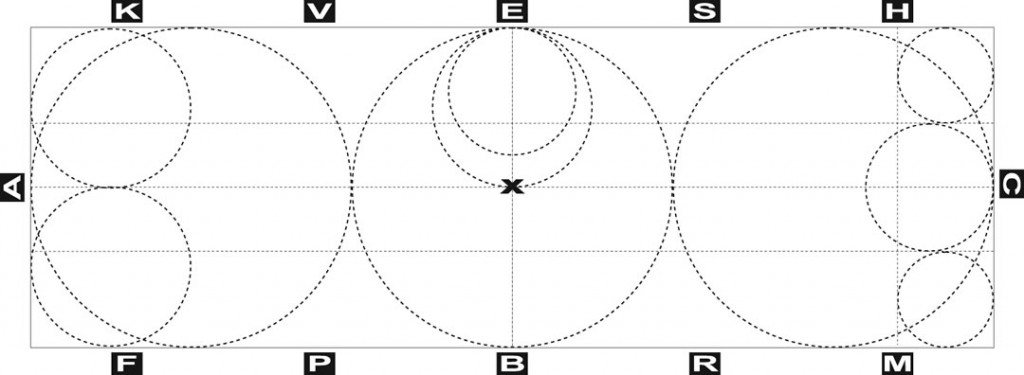
In dressage terms, circles are defined by their diameter in meters rather than feet. A dressage arena is 20 meters wide (65.6’) by either 40 (121.3’) or 60 meters (197’) long. Therefore, when you ride a circle with a diameter that is the width of the arena, you are riding a 20-meter circle. By definition the circle’s diameter is 20 meters; the center point is located on the centerline of the arena, the radius of the circle is 10 meters (33’) and the circumference is 63 meters.
Where the center of the circle is located in regard to the centerline would depend on where you place the circle on the long side of the arena. In a large dressage arena you can ride three 20-meter circles end to end. If you rode a 20-meter circle at the letter “C,” the circle would begin on the short side of the arena at the tangent point “C.” The circle line would touch the long side 10 meters from the corner (imagine a box with 20 meter sides with a circle inside it) and on the centerline 20 meters across from “C.”
Two 20-meter circles can be inscribed end to end in a small dressage arena (20 x 40 meters). These two circles would touch each other at the tangent point in the center of the arena, the letter “X.” The only other place you can ride a 20-meter circle in a small dressage arena is around “X,” with tangent points at “B” and “E” on the long sides. The other two tangent points of the circle would be 10 meters away from “X” on the centerline.
Longeing— A circle by any other name is still a circle
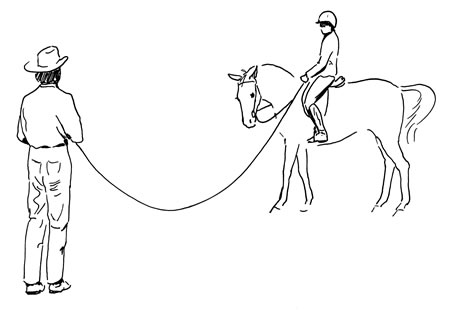
Rarely are circles described by their radius, yet we commonly use the radius of a circle to work with the horse. Whenever we work with a horse from the ground on a circle, we are longeing (sometimes spelled lungeing) even if we are not physically connected to the horse. Longeing differs from work-in-hand and long lining. In the former the trainer is working within and arms-length of the horse while in the latter the trainer is behind the horse with two lines, generally used in preparation for driving. Sometimes horses are longed on different shapes such as large ovals and straight lines. However, the trainer is still at a distance from the horse and uses the radius created by the line (real or imaginary) to work the horse through corners and curves.
The double-longe is another form of longeing where the trainer works from the center point of the circle with two lines, one to each side of the horse. This technique gives the trainer control over both sides of the horse. The inside line acts like the inside rein to determine the horse’s line of travel. The outside line acts as a boundary to the circle similar to a wall, round pen or the rider’s outside aids, especially when working in the open. The double-longe requires tremendous skill and timing by the horseman. Philippe Karl, former member of the Cadre Noir, performed one of the best examples of the double-longe. Karl jumped a horse over a large oxer (spread jump) on a circle in perfect relaxed balance and control. His book, Long Reining, The Saumur Method, recently re-released in English, has wonderful photos of jumping on the double-longe.
Longeing exists in a variety of forms and for a variety of reasons. Equipment and technique vary greatly. Classical longeing technique includes specifically designed longeing equipment; the cavesson, longe line and whip, often with the horse fully tacked. Complete concentration by the trainer is required to ensure that the horse moves in the precise balance and rhythm desired while under saddle. Other longeing methods are more concerned with producing a psychological yielding of the horse prior to mounted work and may be done without any equipment at all. In this case the horse is free-schooled in an arena or round pen without any tack. The trainer is still the focal point for the horse, and the wall of the arena acts as a boundary against which the horse is shaped.
While equipment, philosophy and technique may vary, the essential element of longeing remains the same: the horse moves around the trainer, who serves as the center point of the horse’s line of travel, most commonly a circle. The circular shape provides room for the horse to move and the ability for the trainer to remain within close proximity to the horse with minimal effort. A horse moving along the perimeter of a 20-foot-diameter circle is traveling almost 63 feet every time he completes one circle! Depending on your method of longeing, you might only have traveled a few inches during the equivalent revolution. This is why one must use great caution when longeing young and unfit horses. We are hardly working at all compared to the horse who is traveling a significant distance in the same period of time.
There is great advantage to working the horse on a circle from the ground. Longeing on a circle allows you to work the horse safely from a distance through the various paces, teaching him commands to be used later under saddle. In addition, the horse learns to have submission, balance, understanding of the trainer’s aids and self-control. In order to do it well, the trainer needs to have good timing, observational skills and tact while recognizing the tremendous forces exerted physically on the horse by virtue of the pressure that can be applied within a confined space.
Injuries sustained through overwork or incorrect longeing technique can plague the horse’s saddle career later on. Ligaments and tendons can easily become stressed and strained if not properly conditioned. The potential disadvantages of longeing exponentially increase as the size of the circle decreases and the speed of the horse increases. A circle is a simple figure making it easy to underestimate its powerful effects. When in doubt, it is always best to follow the simple guidelines of larger (the smaller the circle the more demanding it is), shorter (duration, take frequent rest breaks), and slower (the faster the speed the more potential for injury).
The larger the circle size, the easier it is on the horse’s legs. Decreasing the circle size rapidly increases the stress of longeing especially for young, unfit, inexperienced or unsuppled horses. Think of doing a yoga stretch like touching your toes without sufficient preparation. For most horses, cantering on circles less than 20 meters is very demanding. Therefore, it is important to decrease the duration of the activity when increasing the intensity of smaller circles or faster speed.
Footing is also critical when working on circles. Footing deeper than a few inches can be physically stressful. If you aren’t sure about the depth of your footing, run around for a few minutes in your arena. If you find it’s like running on soft beach sand, then it may be too deep. Longeing or riding a lot of circles with young, unfit or stiff horses in deep footing can cause fatigue leading to muscle, ligament and tendon stress and strain.
Finally, longeing isn’t just for the horse’s benefit. For centuries riders have learned how to ride on trained horses on a longe line. In this way the trainer can control the horse’s speed and direction leaving the rider free to focus on gymnastic exercises and their position. At the Spanish Riding School in Vienna, Austria, students spend countless hours on the longe before they are allowed to take up the reins. Unfortunately, longe lessons are not prevalent in the USA for two reasons. First, it is hard to find venues that offer longe lessons. To give someone a good longe lesson requires well-schooled longe horses and competent instructors capable of maintaining the horse in the proper gait, speed and circle shape while offering useful instruction to the rider. This is expensive to maintain and is not available to a majority of riders. Second, we live in a fast-paced world. Most riders don’t want to put in the hours on the longe line needed to develop a good seat before riding out on their own.
Improving your longeing technique in preparation for riding accurate circles
Whatever style of longeing you choose, learning to longe your horse on an accurate circle will help develop your feel for the shape, size and pace of a consistent circle. It will allow you to watch your horse to see what happens when the horse works correctly. Finally, it will help you achieve the self-discipline necessary to improve your horse through riding accurate, consistent, rhythmic circles under saddle.
When longeing, it is important to give the horse time to become steady and consistent in his pace. It is important to allow him to develop a steady trot and canter without interrupting his movement. In other words, you want to develop the subtle skills necessary to make small changes of speed and circle size without stopping the horse. Constant stops, starts and changes of direction may be useful in the initial stages to establish control. However, this will not allow the horse time to develop the desired consistency in each gait for correct work under saddle.
Groundwork should be progressive, just like work under saddle. Once the necessary submission has been achieved, it is time to move on to steady, even work at walk, trot and canter. Work from the ground can become just as interesting as other forms of training when both horse and trainer recognize its value. Longeing is only as good as the trainer’s skill. The better you get the more fun it will be.
Just like other athletes, proper warm up and cool-down are essential to avoid injuries as well as maintain the horse in good physical condition. Longeing can be an excellent way to warm-up (not tire out) the horse physically and mentally. If you are regularly longeing your horse to “get the bucks out” or “work him down” before you get on, I suggest you stop, back up and rethink your program. These are signs of pain, lack of understanding and fear on the horse’s part. You will need to address these issues before you can use longeing as the educational tool it was intended to be. Calmness above all else is essential to the education of the horse on the longe. In an arena vary the program by using cavelletti and different figures such as connected circles in different places around the arena to enhance learning and prevent boredom.

Take your time with your groundwork. To quote Arthur Kottas, former 1st Chief Rider at the Spanish Riding School; “Take your time but don’t waste your time.” Steady, quiet, even work keeping a steady rhythm and tempo in mind will have a huge payoff when you begin your circle work under saddle. Work in both directions. Keep your training sessions short, under 15 minutes total, so that the horse remains fresh in mind and body.
In addition, longeing will give you the opportunity to refine your aids and develop your eye for good movement. Watch your horse’s movement. Is he regular in his rhythm? It might help to get a clip-on metronome to establish a steady rhythm and tempo. Set the metronome at about 108 beats per minute for the walk. Adjust this up or down depending on the individual horse. Once you find a steady beat, see if you can keep your horse “on the beat” by having him maintain a strong forward walk. Does this help the shape of the circle? When the horse is walking forward, taking deep powerful steps with the hind legs, he will be able to maintain a circular shape with little effort on your part other than to keep him at that steady pace.
For trot increase the metronome clicks to somewhere between 140 and 144 beats/minute. Again, see if you can maintain the horse’s trot to the beat of the metronome. You might find that this is harder than it seems! However, once you master this skill, you will find that many of the “glitches” in your circle will disappear when the horse gets on the beat. If you can’t find a metronome, use a portable CD player. Pick a piece of music with a good beat. Even if it isn’t quite optimal to your horse’s stride, you will benefit from the consistency of the music.
Remember, all of this is leading up to lateral work under saddle. The basics of rhythm, tempo, relaxation, calmness and free forward movement must be established in the initial work on the ground and under saddle. Riding simple figures such as circles of various sizes is the basis for progressing to lateral work. If these basics are well established, then lateral movement will be just another step in the progression.
What to look for

When longeing, you know you are on the right track when:
1. The horse maintains the size of the circle on his own without you having to “nag” him.
2. You can make subtle changes in the size of the circle without interrupting the horse’s rhythm.
3. You can transition the horse up and down (halt – walk – trot – walk – halt) without losing the shape of the circle and with a minimum of aids (perhaps just voice).
4. The horse moves in a relaxed manner with a long, low head carriage, lengthening through the back at all paces.
5. The horse steps deeply under his body with his hind legs (“engages”) with a free easy swing.
6. The size and shape of the circle is the same regardless of direction (traveling to the left or right).
7. Relaxation of the horse’s back is observed by the even swinging of his tail and the rhythmic, forward, downward movement of his poll, regardless of the gait and throughout transitions.
8. The horse bends on the line of the circle. This bending is evenly visible throughout the length of the horse, not just in the neck. The neck is relatively straight in relation to the line of the circle.
9. The circle is a continuously curved line traced on the ground, not an octagon shape of connected straight lines. This is easy to see if you work on freshly raked footing.
10. The horse steps evenly with all four feet at the walk, even diagonal pairs at the trot and a clear three-beat “waltz” at the canter or lope.
11. Your horse’s feet are landing flat side-to-side, not on the outside edge. If the horse is bending correctly, the hoof will land flat even when stepping across under the horse’s body.
Remember that you will want to achieve all of these characteristics when under saddle. Adding your weight and influence will change the horse’s balance. The purpose of training is to develop the horse’s self-carriage while mounted. By improving your longeing technique, you will develop the sense and feel for riding an accurate circle under saddle. This is an essential step toward your goal of a balanced, relaxed riding partner.
Longe anyone?
Here are two simple yet powerful exercises to enhance your awareness of longeing and circle shapes. Both require a partner. I suggest you find someone whom you can trade places with to feel what it is like in each perspective. These are also great activities to do with children.
Exercise 1.
Unmounted Exercise
Take your horse’s halter and lead or longe line and head out to the arena or round pen with your friend. Have one of you be the “trainer” and the other is the “horse.” You won’t have to run around very long to realize how much work the horse is doing at the end of the line! If you are the “horse,” hold the lead with your hands held out in front of you. Do not put the halter on your head or neck. The influence of the line is too strong and could cause serious injury even when used gently.
Have the “trainer” ask the “horse” to move around. For fun you can act just like your horse and find out what it feels like. Have the “trainer” shake the line and feel how much power can be exerted on the line with a minimum of effort on the “trainer’s” part. I will never forget doing this exercise with someone. He “popped” the line and it was so intense I was stunned. I couldn’t breathe for several minutes. As a result, it gave me a much greater appreciation for the amount of force that can be exerted by something as simple as a halter and long lead rope.
Finally, change places so that each of you gets to experience being the “trainer” and “horse.” Notice if you act differently knowing it is really a person on the end of the line, not a horse. Are you more tentative because you know you might hurt them? Remember that the lead is attached to the horse’s head and neck, which could also be damaged with excessive use of force.
Exercise 2. Mounted Exercise
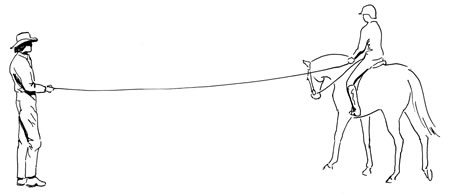
You will need a thin line or lead about 25 feet long. I use several pieces of baling twine tied together; a regular rope lead would be too heavy. Allowing about 6” at one end, mark the line (I use duct tape) at 10 meters and again at 20 meters from the end.
Head out to the arena with your friend, the string and your horse prepared to ride. After mounting, take hold of the 6” extra piece of string with the hand closest to your friend who is standing in the middle of the circle holding the string marked at 20 meters. At the walk, see if you can keep the string firm but not taut the entire time. Don’t let the string touch the ground if you can help it. Also try not to pull your friend out of her spot at the center of your circle.
This is not as easy as it looks! The string serves as an objective observer to the accuracy of your circle. If your circle is irregular, you will either pull your friend out of the center, allow the line to touch the ground or have to let go of the string in order to avoid being dragged off your horse!
Once you have mastered this skill at the walk, proceed cautiously into the trot. Be prepared to let go of the string in order to avoid pulling your friend off her feet or getting dragged off your horse.
A word of advice for the person in the middle: be ready to bend your knees and allow your arms to give in order to avoid getting dragged!
Make sure you go in both directions and change positions with your friend (let her ride her horse on the circle). This is the quickest way to determine the feeling of riding an accurate circle. Don’t worry about your aids. Simply focus on keeping the string at a soft tension and the rest will take care of itself. You will be surprised how your horse’s gait will even out as your string connection improves.
Once you can maintain a 20-meter circle at walk and trot, test your skill by shortening up to the 10-meter mark on the line.
Good luck and have fun with this. Next time we will talk more about riding accurate circles. For now just getting a good feel for the shape is enough.
This article originally appeared in Eclectic Horseman Issue No.28
https://eclectic-horseman.com/mercantile/equestrian-books/instructional/50-five-minute-fixes-to-improve-your-riding-by-wendy-murdoch/