Written by Wendy Murdoch
Rein aids are the means by which we communicate to the horse through the reins with our hands. Reins aids can be described by the manner, direction or intensity in which they are applied. I will attempt to present all three aspects here, in addition to the underlying anatomy and physiological effects of rein contact.
The anatomy of rein contact
Some trainers believe that all resistance begins in the horse’s mouth. Others think if you can’t ride your horse in a snaffle bit, then you are a sorry hand; while others avoid the issue altogether by riding without a bit. Finally, there are those trainers that attempt to solve all resistances by finding the right bit to control the horse. None of these perspectives are entirely correct, and none of them take into consideration the extent to which the horse’s mouth is connected to the rest of his body. If you are to make an educated decision about the type of bit you choose, and the way in which you are going to use it, you need to know something about how the mouth is connected to the rest of the horse.
The bit will put pressure on a variety of places in the horse’s mouth depending on the type used. Bits can place pressure on the tongue, bars, poll, chin and nose or a combination of all of these places. The purpose of the bit is to give the rider a means of restraint, creating a boundary, which the horse responds to by rounding, slowing down, stopping or turning. In other words the bit serves a regulatory function to the motion and direction of the horse. When the horse is comfortable with the bit, it is easy to give him direction and regulate his speed with your seat and reins.
If for some reason the horse is not comfortable, than any bit may cause fear and pain, because the horse anticipates discomfort. This pain can arise from a poorly fitted bit, dental problems or discomfort in other parts of his body. Just because he expresses discomfort in his mouth by opening it, grinding or dropping behind the bit, doesn’t mean this is where the real problem is. Nor should you ignore mouth issues by tightening up the noseband, letting the horse gap his mouth every time you touch the reins, or only riding in a rope halter in order to ignore the problem.
Conversely, thinking that every horse should wear the same bit is like telling riders we should all wear Ariat boots. I don’t know about you, but Ariat’s don’t fit my feet. Every horse has a different mouth conformation: length of lips, thickness of the tongue, width between the bars and height of palate. Therefore each horse should be fitted to a bit as an individual. Finding the bit that your horse is comfortable in is simply part of good horsemanship. However, taking care of your horse’s mouth comfort isn’t the only thing that is important when it comes to rein contact.
Often, the mouth is not the cause but a symptom of a larger problem. That’s because there is a very small but significant bone tucked up inside the jaw area of the horse’s head called the hyoid apparatus (we have these bones too). The hyoid apparatus is series of little bones joined at the front, somewhat like the wishbone in a chicken. What’s significant about the hyoid bone is that it is not attached to the rest of the skeleton, and there are about 20 muscles attached to the hyoid apparatus.
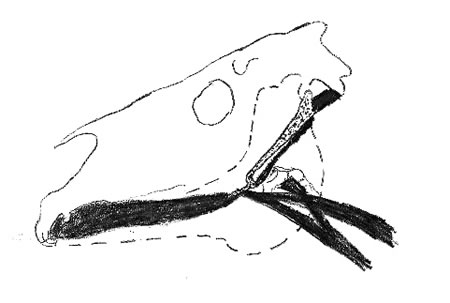
Of significance to riders is the fact that the horse’s tongue muscle attaches to the hyoid bone at the joined end. A group of muscles attach the hyoid to the head, and several very important muscles run from the hyoid to the horse’s sternum and the inside of his shoulder blade. This creates a direct connection from the horse’s tongue to the sternum and rib cage, which means that any back problems will show up as mouth problems and visa versa.
Feel this for yourself. Stick your chest out, pull your shoulder back, and raise your head like a hollow backed horse. What happened to your tongue? Did it drop down and back in your throat? Relax your back, drop your head, and soften your shoulders. What did your tongue do? It probably dropped forward in your mouth and relaxed, filling the oral cavity. This is exactly what happens to a horse. Therefore, if the horse’s back is tense, his tongue will pull back in his mouth because of this connection from the sternum through the hyoid apparatus to the tongue.
When the back is tense, the tongue withdraws, allowing the bit to come into contact with the bars of the mouth rather than rest on the tongue. Many horses will press their withdrawn tongue against the bit, perhaps in an attempt to stabilize the bit, and some horses will get their tongue over the bit. A relaxed tongue that fills the oral cavity is extremely important to proper bit fit, function and communication.
Now press your tongue against the roof of your mouth. How long will you maintain this position before you get tired? How much did this stiffen your neck and shoulders? Pressing your tongue against the roof of your mouth requires effort and engages all the muscles attached to the hyoid bone. This will create stiffness in the throat and all the way down into the chest, shoulders and back.
Ideally, the bit is held by the hanger at a height where the horse does not have to tense his jaw or tongue muscles in any way. This position is unique for each horse. The tongue remains relaxed and fills the oral cavity. The bit will be held in place due to muscular relaxation not muscular effort.
Take a look at your horse’s mouth after you have put the bit in. Part the lips apart, and see how the tongue fills the entire oral cavity. That is what you want in order to have your horse comfortable in the mouth and listening to the signals from the bit. When the tongue is relaxed, the muscles coming from the hyoid to the sternum will also be relaxed, allowing the horse to lift his withers.
In addition to hyoid’s muscular connection, this apparatus is largely responsible for proprioreception. Proprioreception is the ability to sense where you are in space. Think about walking down a flight of stairs in the dark. You think you are at the bottom and find out there is one more step! You nearly kill yourself, because your sensory system had prepared you for meeting the landing rather than dropping to the step below.
Proprioreception is extremely important for the horse. Without it, the horse would not be able to carry us safely. When tense muscles restrict the hyoid bone, the horse’s proprioreceptive ability becomes limited. The bottom line is that if the hyoid apparatus is restricted, it will affect the horse’s performance. This can be caused by mouth problems or back problems, because the muscles of the sternum and back are intimately connected to the tongue through the hyoid bones. Anything that is stressful to the horse’s back will alter his mouth comfort, and anything affecting his mouth comfort will affect his back. If the horse’s mouth is relaxed, then the rider can take a varying degree of contact depending on the job at hand without the horse’s objection.
[symple_divider style=”solid” margin_top=”20px” margin_bottom=”20px”]
Gradients of Contact
According to Gustav Steinbrecht in The Gymnasium of the Horse, “There are three gradations in the degree of contact, namely, the light contact, the soft contact, and the firm contact.
“For a light contact, the reins are the longest since they should be as little tension as possible… The fist is half open so that only the thumb and forefinger hold the ends of the reins; however, the little finger and the ring finger are not closed. This type of fist formation has a dual advantage. Because of its weakened position, it is unable to have any harsh effect and by alternately closing and opening his two lower fingers, the rider can influence the horse in a fine, imperceptible manner without having to move his wrist.
“For a soft contact, the reins are a bit shorter, the rein tension a bit greater, the rider’s position vertical, and the position of his hands a hand’s width away from his body so as give him enough room for stronger hand movements. His fists form the ‘soft hand’, by meaning they are closed in such a way that the last joint of the fingers is extended and a hollow fist is formed.
“The firm contact requires the shortest reins, partly because the rider’s upper body is leaning more foreword, and his hands must be at a greater distance from the body for the often required strong pulls. The hands must be formed into firmly closed fists so that all of the fingers participate in keeping the reins at the required length. With this type of contact, index finger and thumb cannot do this alone. This then is the firm hand which every trainer must use from time to time as an aid or a means for correction when he is training a young horse.
“Contact is correct, no matter to which degree the individual horse takes it, depending on its training, as long as the horse reacts or responds to the action of the hand.”
[symple_divider style=”solid” margin_top=”20px” margin_bottom=”20px”]
Types of rein aids
In The Principles of Riding Official Instruction Handbook of the German National Equestrian Federation, rein aids fall into 4 categories: regulating, yielding, supporting and the non-allowing rein.
“The regulating rein aid can vary the intensity of the aid depending on whether it is exerted by a slight pressure of the ring finger on the rein, or by a rounding of the wrists, or even by an involvement of the whole arm. The function of the regulating rein is to make downward transitions, shorten the stride within a pace, halt or rein back, flex the horse or to make the horse alert.
“It is of utmost importance that the rider never ‘gets stuck in it’. Every regulating rein aid must end with a yielding of the reins.
“The yielding rein aid can vary in extent from a relaxing of the joints of the fingers to a stretching forward of the whole rider’s arm.
“The supporting rein aid is given with the outside rein when the horse is bent. The hand applying this rein aid moves close to the neck, but must never cross the mane. The outside supporting rein controls the degree of bend in the horse.
“The non-allowing rein aid contains the energy and forward movement that the rider created in the horse. The rein aid is sustained with increasing forward driving aids, until the horse submits to it and becomes light in the hand. The forward driving aids must be emphasized. Without them, or if they are too weak, the non-allowing rein aid would be a mere pull. When using the non-allowing rein aid, it is of crucial importance for the rider’s hands to yield the reins at the exact movement when the horse becomes light, on the bit and submits in the poll. “
[divider]
The five rein effects
In addition to the qualities of using the rein, there is also the direction in which the rein is used. These are generally referred to as the 5 rein effects. The effect of the rein is determined by the position of inside hand and the direction of action on the rein.
These five effects are capable of an infinite number of variations, depending upon the exact amount and direction of the force applied, as well as upon the various combinations of effects employed. They are further modified by the actions of the rider’s legs.
For those who are wondering, a plow rein is a western term referring to riding with two hands, whereas neck reining refers to riding one handed. All these rein effects as described are performed holding the reins in two hands.
The reins act through the mouth on the head, neck and the shoulders. They permit the displacement of the head with respect to the neck; the neck with respect to the shoulders; and the shoulders with respect to the haunches. They may even act indirectly on the haunches by giving the shoulders such a position that the haunches are obliged to change direction, which is called ‘opposing the shoulders to the haunches’. The term opposition as used in connection with rein actions implies an effect of opposing the shoulders to the haunches, which, as is stated above, is produced by ‘giving the shoulders such a position that the haunches are obliged to change direction.” This position and result are produced by rein action, which changes the direction of the shoulders (forehand) at the same time that it retards them, implying an increased tension on the reins.
[symple_divider style=”solid” margin_top=”20px” margin_bottom=”20px”]

1st rein effect – The Direct, Leading or Opening Rein
The direct or leading rein guides the horse’s nose in the desired direction of travel. When traveling on a straight line, each hand is directly back from the bit and equal distance apart, while following the movement of the horse. When turning, the direct or leading rein is held out to the side in order to guide the horse’s nose in the desired direction. There should be no backward traction on the leading rein. The intent of the opening rein is to show the horse where you want him to go.
[symple_divider style=”solid” margin_top=”20px” margin_bottom=”20px”]
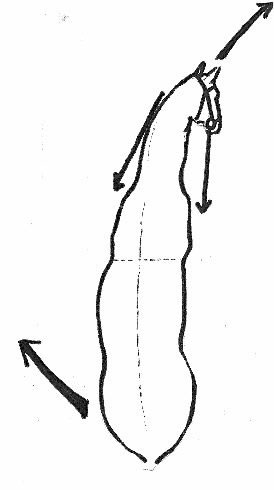
2nd rein effect – Direct rein of Opposition
The direct rein of opposition turns the horse sharply. The active hand is carried slightly away from the body and to the rear, increasing tension on the rein. The supporting (outside) rein is slackened slightly to allow the horse to turn his head towards the active hand. The reins remain parallel to the horse’s axis.
[symple_divider style=”solid” margin_top=”20px” margin_bottom=”20px”]
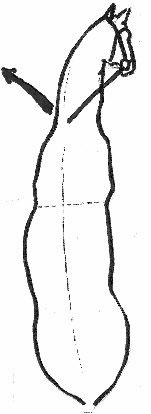
3rd rein effect – The Bearing, Indirect, Contrary, Counter or Neck rein
The neck rein acts upon the base of the horse’s neck in front of the horse’s withers. According to most texts, the horse’s nose looks in the opposite direction to the line of travel; i.e. the horse is moving to the left, but his nose is looking to the right, away from the bearing rein. This form of neck rein is commonly seen in polo. However, in modern reining, the horse looks in the direction of travel away from the neck rein. This is achieved by using both an opening rein and a neck rein in teaching the horse to respond to the neck rein. As the horse becomes more experienced, the opening rein can be dropped, and the neck rein becomes the primary rein.
[symple_divider style=”solid” margin_top=”20px” margin_bottom=”20px”]
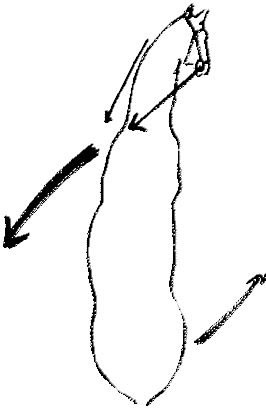
4th rein effect –The Rein of Indirect or Contrary Opposition, in front of the withers
To apply the 4th rein effect, the inside hand moves in front of the withers and across towards the opposite shoulder. The outside hand moves to the outside, parallel to the inside hand. Therefore, both hands are moving diagonally to the outside. This will cause the horse to move his forehand towards the outside while his head remains looking towards the inside, engage his hindquarters under him so that he can raise his forehand, and move his forehand laterally. The horse pivots around an axis, passing approximately through the vertical of the stirrup leathers. It is very effective for straightening the horse by putting his shoulders in front of his hindquarters when he is moving forwards.
[symple_divider style=”solid” margin_top=”20px” margin_bottom=”20px”]
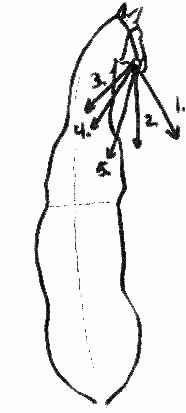
5th rein effect – The counter-rein of opposition passing behind the withers or intermediary rein
The intermediary rein of opposition acts between the direct rein of opposition (2nd rein effect) and the indirect rein of opposition (4th rein effect). The difference is the direction of action of the inside rein. As it approaches parallel to the horse, the rein effect becomes that of a direct rein of opposition. As the inside rein travels towards the withers, but remains behind the withers, it is the rein of indirect opposition in the rear of the withers (5th rein effect). Once the rein crosses in front of the withers the rein effect becomes the indirect rein of opposition, which is in front of the withers (4th rein effect). The indirect rein of opposition passing behind the withers acts upon the shoulders and the haunches and displaces the whole horse towards the outside.
[symple_divider style=”solid” margin_top=”20px” margin_bottom=”20px”]
*The 5 rein effects are taken from the following texts: Effective Horsemanship, Noel Jackson; Riding and Schooling Horses, Lt. Col. Harry D. Chamberlin, Classical Horsemanship For Our Time, Jean Froissard; The Calvary Manual of Horsemanship & Horsemastership Education of the Rider, edited by Gordon Wright.


