Written by Wendy Murdoch
This article originally appeared in Eclectic Horseman Issue No.46
Before we progress to lateral movements we have one more topic to cover, that of rebalancing your horse through the halt, half-halt, rein-back and rock back. All of these movements are related in that, when done correctly, the horse learns to transfer weight to the hindquarters, lower the haunches and flex the hip, stifle and hock joints. The difference between them is more of a question of degree; therefore, I have grouped these 4 movements together.
To clearly define the halt, half-halt, rein-back and rock back, I have referred to several authors including Nuño Oliveira, Alois Podhajsky and 18th century ecuyer, François Robichon de la Guériniere.
Half-halt yourself
Go for a walk. As you walk, hesitate slightly holding your weight over the foot on the ground while your other foot is in the air. Allow yourself to sink into the standing leg as you hesitate (coil your joints to store potential energy). Can you gradually lengthen the time that you can hesitate or hold your balance on one leg without strain? See if it is the same on your other leg.
Now test that you can push strongly forward from that grounded foot as your body passes over it. Do you fall forward, step down quickly with your other leg or shift your weight to the same leg to push? Generally people and horses have a preferred leg; however, it is important that your horse is able to half-halt and push over either hind leg.
Now make the hesitation long enough that you can step your other foot into a square halt. Notice how important it is to be able to hold your weight on the grounded leg. Before you walk forward again you have to decide which leg is going to push you forward. Shift your weight slightly over what will be the pushing leg. Push off the loaded leg and walk strongly forward. You half-halted (loaded that leg) to prepare for the forward movement then pushed yourself forward. If your weight is on the wrong leg, your first step will be short, unbalanced and with little forward thrust. Make sure you can load either leg and hold that weight before you push yourself forward.
Halt
“The full halt brings to a stop a horse that is in motion.”
— Waldemar Seunig, Horsemanship a comprehensive book on training the horse and its rider, 1956.
“In the training of a dressage horse the importance of halts is magnified because frequent and good halts ensure collection. The skill, the strength and the ability to collect are greatly enhanced by correctly executed halts.
“A correct halt is really a ‘movement’ one in which the forward progression has temporarily been omitted. Yet the horse must remain ready for ‘transportation’ while he is temporarily not in progression through space. The posture of the horse at the halt must suggest latent movement. Readiness to depart from the halt, immobility filled with the energy necessary to depart it, are the essential requirements of a good halt. A good halt is always performed handless. The reins merely transmit what the seat and torso have spoken.”
— Charles de Kunffy, The Athletic Development of the Dressage Horse Manege Patterns, 1992.
“Two things define a good halt. The first is immobility… The second requirement for a good halt is perfection of balance. This is demonstrated by the squareness of the halt. When a halt is good, all four feet stand square.”
— Alois Podhajsky, The Complete Training of Horse and Rider In the Principles of Classical Horsemanship, 1965.
Half-Halt
“The half halt is a signal given the horse to decrease its rate, or merely to improve its carriage, or to make the horse easier on the reins, when it bores on the bit and presses on the reins.”
— Waldemar Seunig, Horsemanship a comprehensive book on training the horse and its rider, 1956.
“Half-halts facilitate the readjusting of the horse’s balance. You execute one any time you need to rebalance the horse, usually to increase his collection. Since the only correct definition of collection is an increase in weight bearing by the haunches, the definition of a half-halt is an action that produces this effect. A half-halt must precede all transitions and every change from traveling straight to traveling bent.
“Half-halts are not executed with the hands. The hands holding the reins correctly must become extensions of the activities and position of the torso and seat.
“Each half-halt done is different from all the others. The period of restraint (passive resistance) exchanged for a period of forward flow always differs. How long you sustain each, how the proportion of restraint to drive is worked out and how much lightness of forehand, engagement of haunches may be produced, will vary. But even if no two half-halts are identical, they always emphasize the change in the balance of the horse for the better. If you do not feel improvement in the balance, then you have not succeeded in performing a half-halt.”
— Charles de Kunffy, The Athletic Development of the Dressage Horse Manege Patterns, 1992.
Therefore, halts bring about immobility while half-halts are the essence of a halt used to rebalance the horse. Half-halts may be ridden at any moment that the rider feels the horse lacks balance. Halts, while immobile, must possess the potential for movement, the readiness for the horse to return to motion without hesitation.
A good half-halt then has two parts – the loading (coiling) of the hind leg and the improved push from that loaded leg. Coiling the joints creates potential; using that potential to push firmly off the grounded foot creates impulsion. The combination of coiling and pushing is a half-halt. Depending on the movement, the coiling (flexing the joints) or pushing phase may be emphasized. In a down transition the coiling increases. In an up transition the push off the ground predominates, having been preceded by coiling.
Rein Back
“If the horse gives a half a step back, drop the reins and pat him, going forward immediately. When he does some steps easily, the rider must put him back into the same pace that he was in before the halt and make sure the cadence is the same.
“The important thing is that the rein back be easy and slow during the exercise and that the departure be instantaneous.” — Nuño Oliveira, Translation of Classical Principles for the Art of Horse Training, 1984.
“In the rein-back the [horse’s] legs do not move in the sequence of the walk, but in that of the trot: for instance, the right diagonal followed by the left diagonal so that only two hoof beats can be heard. The rein-back is correct if the horse lifts his diagonal feet off the ground and puts them down again together; he should not creep back dragging his feet along the ground.
“The rein-back is another useful punishment, but it must not be prolonged, as it would create pain in the hind legs and cause evasions from the horse.
“If…the horse has made sufficient progress in his ability and in the development of his joints and muscles, he is ready to be taught the rein-back. This can be the case only if the three joints of his hind legs have become sufficiently supple and if the action of the reins goes well through his body.
“When reining back the horse must not oppose the action of the reins or move back with reluctance, dragging his feet along the ground. The diagonal legs must be seen to be lifted from the ground as a pair and moved back in a straight line, step by step, without faltering in the movement and without the hindquarters deviating to either side.
“The rein-back will be the proof of the degree of the suppleness of the horse, of the action of the rein going through the body and above all, of his obedience. It may also be used as a punishment for naughtiness or inattention. Above all, it will be proof of the correct bending of the joints of the hind legs, which will make the strike-off into the canter easier from a rein-back than from a halt. This exercise is correctly executed when the horse can strike off in to the canter from the rein-back without any intermediate steps.”
—Alois Podhajsky, The Complete Training of Horse and Rider In the Principles of Classical Horsemanship, 1965.
“Furthermore, the rein back, providing it is executed regularly and correctly, is an excellent means of suppling the loin and the hindquarters, but it is harmful to the development of flexibility when it is badly executed.
“In a correct form…. His general attitude does not alter. His limbs move at the same speed as his body and remain in suspension from the same length of time as they remain in support. He reins back with long strides, and perfectly diagonal steps. His feet are lifted off the ground to the same extent as in forward movement. He is able to arrest the backward movement at any moment and to move forward without difficulty.
“This is the rein back in balance, the one which is “useful” from the point of view of the gymnastic development of the whole body.
“It is an incorrect form of rein back which is difficult to check and from which a return to forward progression is difficult without a pause at the halt of varying length.
“As General Detroyat so truly used to say: ‘The first thing which we must teach the horse is not to rein back.’”
— General Decarpentry, Academic Equitation A training system based on the methods of D’Aure, Baucher and L’Hotte, 2001.
“It is the essence of the movement that the horse should rein back straight in a well placed attitude of his head and neck with his spine well arched.
The advantages of the movement are that it develops, when done properly, the flexibility of the loin and the whole of the hind quarters; hips, stifle and hocks.
Incorrect forms of the rein back are:
- With the withers lowered and the front feet stuck out in front to evade the gymnastic of the hindquarters
- With the head up and neck and loins hollowed
- In short precipitate steps (to avoid arching the loins in reasonably long steps of the hind legs) without the necessary cadence or straightness
- Running back against the aids, out of control — Noel Jackson, Effective Horsemanship, 1967
“Even though the rein back is a punishment for a horse who does not obey the halt well, it is still a means of preparing him to place his weight on his haunches, to position his back feet, to steady his head, and to make him light in the hand.
“When a horse backs up, one of his back legs is always under the stomach, he pushes the rump back, and he is, in every movement sometimes on one haunch, sometimes on the other. However, he cannot accomplish this action well, and one must not demand it of him until he begins to supple himself and obey the halt;… since this lesson causes soreness in the loins and hocks, it is necessary to use it moderately in the beginning.
“When a horse persists in not wanting to back at all, which happens to almost all the horses who have not once practiced this lesson, a person on foot lightly uses the point of the switch (whip) on the knees and the fetlocks, which are the two leg joints, in order to make the horse bend his leg; and, at the same time, the rider draws the bridle hand back towards himself, and, as soon as the horse obeys by taking a single step back, it is necessary to praise and caress him in order to make him know that this is what is demanded of him. After having made a difficult horse back up a few steps and after having praised him, one must then keep him slightly in hand (as if one wanted to back him up again), and, when one feels him lower his haunches in order to prepare himself to back up [rock back], it is necessary to halt him and praise him for this action which proves that he will soon back up at the rider’s will.
“In order to back a horse according to strict rule, it is necessary during each step he takes back, that he remain ready to move forward again; it is a big mistake to rein back too quickly since the horse, thus accelerating his energies to the rear, could drive himself back and even be in danger of falling over, especially if he has weak loins. Moreover, it is necessary that he backs up on a straight line, without moving sideways, so that both haunches are equally brought under him while backing.”
—François Robichon de la Guériniere École de Cavalerie Part Two, 1730, translated 1978.
Note that la Guériniere suggests a ground person if your horse is having difficulty with the rein-back. If your horse is stiff in the hips, sore in his back or hocks or for some reason does not understand how to back, you must use great caution in asking him to back from the saddle. It would be best to teach the horse to back from the ground and then when under saddle with an assistant asking the horse from the ground until the horse understands. If the horse is still having difficulties, look for some form of pain which is preventing him from backing such as saddle fit, teeth problems, soreness in his back or hind leg joints. Do not force your horse to back, as you could cause him to rear or flip over backwards. Find other ways to help your horse understand what you are asking or find someone to help you teach him to back up safely.
“The Basics” and “Advanced Work” with Nuno Oliveira 2 DVD set
Rein-back is the act of stepping backwards from the halt. Rock back is the essence of rein-back; the horse shifts his weight to the hindquarters but does not take any steps. This is like a half-halt; the horse takes more weight over one hind leg and then pushes forward from that loaded leg.
The Aids for rein back
There are several different ways riders can ask a horse to rein-back. Some riders lean slightly forward, some lean slightly back. I prefer that the rider stays in the middle. This is because rein-back is followed by forward motion. The less the rider has to adjust her position going backward or forward, the less she will disturb the horse. Immediate reversibility (forward/back or back/forward) can be attained if the rider remains in the middle with subtle aids directing the horse backward or forward. Refinement of the rein-back aids can then be used for rock back, half-halt and halt.
For moving backward or forward, imagine that you have a ball spinning slowly inside your pelvis. The direction of the spin is down the back and up the front. This spin does not change regardless of whether you are going backwards or forwards. What changes is where you release the energy from the spinning ball. (refer to EH#37)

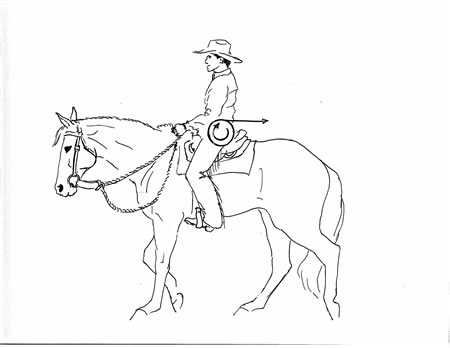
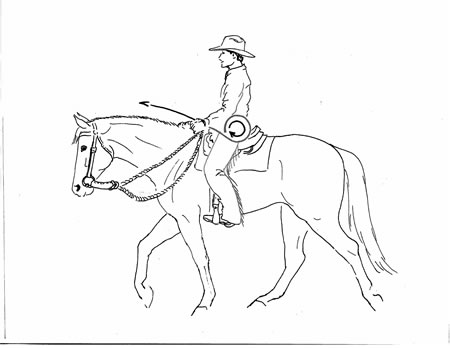
For rein-back think of releasing the energy from the top of the spin – through your waist and back, towards the horse’s tail. (Figure 1.) To go forward, think of releasing the energy from the spin through your hips towards the horse’s ears. (Figure 2.) This will engage your seat and keep your back lengthened when asking the horse to go forward.
Do not intentionally shift your weight. Instead let your weight shift slightly on its own depending on whether you are emphasizing the backward feeling or the forward feeling. Close your fingers on the reins.
In the beginning your reins need to be short enough that you only need to close your fingers to feel the horse’s mouth. You don’t want to pull your horse back; you want to send your horse back from your seat. Therefore, the reins simply create a barrier to forward movement. This barrier is similar to a wall off which you bounce a ball. You can’t pull the wall back to the ball, and the wall needs to be firm in order for the ball to bounce off of it. The reins are there to act as a limit to the horse, like the wall.
If the horse tries to move forward, you simply make a wall with the bit. Don’t try to pull the bit backwards. You may need to shorten your reins in order to keep your elbows slightly in front of you and maintain your position.
Finally, add as little leg aid as needed to create backward movement. Pulling with the reins, pumping with your seat or gripping with your legs will create tension in the horse. If you can feel the feet or you have a ground person, you can ask with your leg on the same side as the horse’s leg that needs to step back, thereby using an alternating leg aid. A vibration or light tapping with the leg is more effective than gripping or kicking as this will tighten your hips and block your horse from stepping backwards.
If the horse has no movement to direct with your seat, your legs need to create that movement. Obviously, if the horse really doesn’t understand, it is best to start teaching him to back up from the ground, then in the saddle with a ground person helping. It is very important that you don’t overdo the exercise in the beginning. A horse that is stuck in his hips or sore can be very dangerous when backing up because he could flip over if he gets anxious.
To go forward again, seat sets direction (energy from through the hips), reins allow the forward motion, legs are the accelerators. (See Figure 2.)
Aids for riding rein-back, forward, rock back, half-halt and halt
Rein-back
Seat – Stay central in the saddle (do not lean back, forward or sideways). Keep your seat level (do not let one side of your pelvis drop down). Look forward to maintain a straight line when backing up. Waist area at the back expands towards the horse’s tail.
Weight – Keep your weight even on your two seat bones.
Rein – Establish contact on both reins; maintain contact without pulling. Give a release of pressure with each step by opening your fingers slightly. In the beginning drop the reins when you get a really good step.
Leg – Alternate leg aids – using the leg on the same side as the horse’s leg that needs to step back. Once motion is established, use both legs to accelerate the rein-back.
Vary the number of backward steps starting with only one or two in the beginning.
The horse is never allowed to rein-back on his own. This is a terrible fault and must be avoided. If the horse starts to anticipate rein-back, ride several transitions to halt until he will stop and stand immobile without anticipating moving forward or backward.
Forward after rein back
Seat – Stay central in the saddle (do not lean back, forward or sideways). Keep your seat level (do not let one side of your pelvis drop down). Look forward to maintain a straight line when backing up. Allow your hips to open at the front.Engage your seat by sending the energy from the spinning ball through hips towards horse’s ears.
Weight – Keep your weight even on your two seat bones.
Rein – Soften the fingers on the reins to allow the horse to move forward.
Leg- Use both legs just behind girth (a light tap, vibration, closing of the calf or ankle bone). Whip or rope as necessary if horse sticks when shifting from backward to forward.
Rock Back – a combination of rein-back and forward motion
In rock back the horse shifts his weight to the back leg, without taking any steps. It requires that you feel the moment when the horse shifts, catch him and send him forward immediately so that he does not take any steps. This exercise sharpens your timing so that you feel the moment the horse shifts his weight, which is important when riding any transition.
Start with the horse standing unevenly with the hind legs. (Square behind is a more advanced exercise as the horse would have to shift back over both simultaneously)
Use the same aids for rein-back and forward as above but much less of the rein-back aids. Too much and the horse will take steps instead of shift. You must use the forward aids and get a response quickly without being abrupt or rushing the horse.
Halt from walk using the rein-back aids
In the walk think of asking the horse to back up using your seat, weight and softly closing your fingers on the reins. If you get a hesitation, allow the horse to walk on.
Repeat this many times until you feel that the horse can organize himself into a halt.
Recall the half-halt exercise above.
If you feel like you are pulling on the reins, let go and start again. If you get a lot of resistance in the horse’s mouth, use a subtle vibration with the reins to keep him from setting against the bit.
Think of the energy going through your waist over his tail so that he shifts his weight and steps into the halt.
As the horse halts, soften your fingers on the reins.
Half-halt
In riding the walk to halt transitions above, you were riding half-halts into halt. To time your half-halt effectively think rein back on the landing phase of the outside hind leg. Depending on how sensitized your horse is, you might have to do much less than you think because he is ready to coil his joints and load the outside hind leg. Once this happens, work on improving the forward push from the outside hind leg support phase of the hind limb by asking him to go strongly forward as he is pushing off the outside hind leg. Recall the forward part of the rock back exercise.
Alternate between the landing phase coiling and the support phase push until you feel the horse land solidly and push strongly off the outside hind leg.
Change directions and repeat with the other hind leg.
Make sure your horse uses the outside hind leg, not the same leg, regardless of direction.
In rising trot, think of the rein-back in the rising phase to coil the outside hind leg.
Think of the forward/upward swing through your hips in rising to improve the push phase of the outside hind leg.
This article originally appeared in Eclectic Horseman Issue No.46