
Written by Wendy Murdoch
Have you ever heard the term half-halt and wondered what it meant? Have you wondered how to ride a half-halt? Maybe you have never heard of this term at all, but you are looking for a way to control your horse without using your hands.
In this article I am going to give you a simple definition of a half-halt and a terrific exercise to learn how to ride one correctly. Once you learn how to use your back you will have the skills to ride good, solid half-halts useful for any discipline.
I first learned about the idea of using a blood pressure cuff (BPC) to teach people how to ride half-halts from a student of mine, Dedee Swift. She has back problems and went to a physical therapist for help. One of her home exercises is using a BPC to learn how to control specific muscles, which would alleviate her pain. Therefore, even if you aren’t interested in improving your riding but you have back pain, read on.
Dedee showed me the basics and I was off and running. I have created a series of exercises you can do in order to develop the skills necessary to ride correct half-halts. The BPC acts as a biofeedback mechanism so you can “see” what you are doing with your internal muscles. Once you learn to control these muscles you gain control over how you use your back when riding.
In Western riding I have yet to come across a term equivalent to the meaning of a half-halt. While all good Western riders use half-halts they simply do not refer to it as such. In English disciplines there are numerous descriptions and ways of riding a half-halt, some more effective than others.
Some people teach a half-halt using only the reins while others teach riders to “drive with the seat while holding 10 lbs of pressure in your hands.” I think trainers don’t understand what they are doing when they ride a half-halt so they try to teach you what they think they are doing. In the end the information is misconstrued that half-halts are largely misunderstood, poorly taught and badly ridden. Most people end up pulling on their horse’s mouth in order to gain some degree of control without any thought to what happens physiologically. Interestingly enough, when you physically balance a horse by riding good, clear half-halts you balance the horse mentally as well. Better yet, once you learn this skill you can also use half-halts while doing your groundwork to make your body position more effective and teach your horse how to balance himself in hand.
I teach that the basic half-halt is the same for all disciplines. The difference is in the nuances, how much you do, whether you include the use of the rein or not, how sensitive the horse is, etc. This is because all horses basically have the same structure (people too). We all have a skeleton, we have to deal with gravity and there is an efficient way to use our body in gravity. Therefore, the basic concept of a half-halt, based on anatomy and physiology, is the same. How much, how little, how long or how short are the subtleties that reside in the application of the basic aids of the half-halt.
Definition of a half-halt
For me a half-halt rebalances the horse; therefore, any action by the rider that rebalances the horse is a half-halt. This could be as simple as taking a deep breath if your horse responds. Another way to look at a half-halt is that it is half of a halt. You don’t want the horse to stop, but you want him to act as if he might stop so that he can get his hindquarters underneath him and reorganize his balance.
When ridden correctly half-halts prepare the horse for an action: stopping, going, turning, jumping a transition within the gait or simply to listen a little more carefully to what is going to happen next. I think of it as the “and” in the sentence, “and walk, and trot, and canter” etc. It lets the horse know something is going to happen, to prepare for that action and prepare to perform the action that is going to be requested.
When we fail to give the horse a signal that something is going to happen we surprise him and create tension and stiffness. A half-halt tells the horse to get ready. Some activities cause the horse to rebalance himself without the rider actually requesting the action. A good jumper will assess the distance to a fence and check himself in order to find the takeoff point correctly. An athletic cow horse will read what the calf is going to do next, check himself and be prepared to move off in the new direction without the aid of the rider. Not every horse understands innately how to do this, just like not every person is Michael Jordan and knows how to fake the jump shot before putting the ball in the hoop. Most all horses are able to rebalance themselves on their own, but under the weight of the rider the horse loses the ability to make the correct adjustment until he learns to deal with the added weight.
How do I ride a half-halt?
Many people think that a half-halt is all about what you do to the horse. I think that in order to ride a half-halt you have to be able to balance and rebalance yourself even when the horse is knocking you off balance. If you are unstable you are unable to ask your horse to rebalance himself because you are a major part of his imbalance. If you are solid in your position, you will be able to balance yourself and help your horse balance and rebalance, i.e., half-halt. Therefore, riding a half-halt means you have to be able to independently stabilize yourself even when your horse loses his balance.
This still doesn’t tell you how to ride a half-halt. Commonly riders are told drive with their seat and legs while maintaining a strong contact with the horse’s mouth. I find this approach seriously lacks a fundamental understanding of the mechanics of a half-halt. In order for the horse to rebalance himself he has to be able to stabilize the loin area, engage the pelvis and free the hips in order to swing the hind legs deeply under his body. For the inside hind leg to travel farther forward, the outside hind leg has to be able to hold the ground and support the horse and rider as the inside hind leg is traveling forward. The inside hind leg needs to reach under the horse’s center of gravity and support the weight as the outside hind leg advances. The lower back stabilizes in order for the hind legs to advance. The internal muscles of your loin area and pelvis are essential in maintaining the stability of the lower back and pelvis as the hind legs swing under/forward to redistribute the weight of the horse and rider to the hindquarters.
What muscles are involved?
Generally muscles act together and share the work; therefore, it is too simplistic to talk about any one muscle. However, in the case of a half-halt one group of muscles is so critical that we need to mention it. It is active and important in both horses and humans. It is called the psoas (pronounced SO-az). If you like to eat tenderloin then you are enjoying the delicious taste of the psoas muscles. There are typically two components, psoas major (larger) and psoas minor (smaller) muscle. Not everyone has psoas minor on both sides of their back. Don’t worry, if this is the case you can learn to strengthen the two sides of your back evenly, enabling you to be symmetrical when you ride.
The psoas muscles run along each side of the ventral surface of the spine from the lower thoracic vertebrae to the sacrum. The psoas joins with the iliacus (ILL-e-a-cuss), which lines the inside of the pelvis, and together they have a common tendon that connects to the lesser trochanter on the inside of the femur. Psoas is responsible for flexing the lumbar region of the back, engaging the pelvis as well as flexing the hip. When psoas is not working correctly for riding, the lower back will tense, causing the loin area to hollow creating an arched lower back in both horses and humans.
The lumbar roots of the psoas are intimately tied with the root of the diaphragm. This may explain why breathing is so critical to correct back function. When you hold your breath, your psoas tends to stiffen, preventing the lower back and hind leg from engaging rhythmically under the body with each stride. Notice that when your horse starts to breathe regularly his balance improves and the same goes for you.
From a riding perspective when psoas is working correctly it creates engagement of the pelvis and hindquarters by flexing the lumbar region of the spine (raising it slightly), making more room for the hind leg to swing under the body and draws the hind leg forward underneath the body due to the attachment of the common illiopsoas tendon. By engaging the hindquarters the horse is able to catch his balance, therefore half-halt or rebalance. This does not need to be a big move, but it can be as in a slide stop, or it can be quite small as in a slight rebalancing before the corner of the arena at the working trot. To whatever degree it is applied (and this is where the modifiers of the rein and legs come in), the horse is more capable of carrying the load on his back and is prepared for an action, whether that be changing direction when chasing a cow or organizing himself for the effort of jumping.
When, where, how Much . . ?
How often you ask your horse to half-halt, when you ask him, where in his movement you ask all depend on what you are doing. I will not go into detail on these questions at this time. When we return to the discussion on lateral work, timing the half-halt correctly becomes critical to the success of the lateral movement. First, in order to ride a half-halt correctly, you have to learn how to use your back basically in the same way you want your horse to use his back. Once the body of the half-halt is mastered using the BPC exercise below you will be able to see how reins and legs simply modify the conversation, not create it. To use one of my more favorite expressions when teaching, “seat sets direction, legs are the accelerators, reins catch the forward.” In this context the seat also sets the balance for direction through the use of half-halts.
Blood pressure cuff exercise
To begin you will need to go to your local pharmacy and purchase a basic blood pressure cuff with an analog (dial) monitor for reading the pressure. Digital blood pressure cuffs do not give you the visual feedback necessary.
Photo 1. You need to modify the cuff as follows:
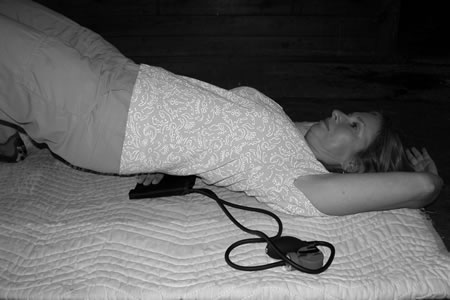
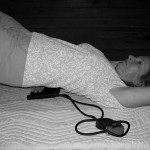
Photo 2. Carefully remove the metal bar that is at one end of the cuff. Be careful not to puncture the air bladder inside the cuff. At the other end is stiff rubber tubing. Remove this also. Photo 3. Fold the cuff flat into thirds with the bladder in the middle of the folded cuff. Make sure the tubing is off to one side and not crimped inside the folds. Photo 4. Lie down on a flat surface, preferably padded but not too soft, with your knees bent and your feet on the floor. Lift your pelvis and place the folded BPC underneath the center of your lower back. Arrange the tubing so that it is toward the outside corner closest to your head giving you the maximum length of tubing to make reading the dial easier. Photo 5. Rest your back to the floor. It is OK if your lower back does not touch the cuff. Pick up the dial and hold it so that you can watch the needle. Take the bulb in your other hand. Close the valve so that air remains in the cuff. Photo 6. Begin to pump the bulb while watching the needle until it reaches and stays at 40 on the dial. This is your baseline.
Once you have inflated you shouldn’t need the bulb again. If for some reason the resting number drops after doing some of the exercises check to be sure that your valve is securely closed, reinflate until you get to 40 and start again. Occasionally after doing the exercises the baseline pressure increases. This is fine. It means when resting, your back is closer to the floor. Photo 7. See if you can make the needle go up while noticing how much effort this takes. If the needle does not rise very much check that the tubing going to the dial is not crimped. Otherwise you are engaging a whole lot more muscle than necessary for this exercise. Using the BPC will train you to use the correct muscles without extra effort. If you are bracing all of the muscles into abdominal and lower back region you impede the psoas. Ultimately you want to be able to make the needle rise without engaging very much abdominal muscle. The more differentiation of the muscles you can develop, the greater the subtlety of your seat in the saddle.
Find out what makes the needle go down. Arch your back away from the floor slightly. The needle will drop to zero because you have taken the pressure off the BPC. Pressing the loin area toward the floor increases the pressure, arching the back (hollowing) removes the pressure. Photo 8. Bring both knees to your chest watching the dial. Note the number on the dial and the amount of effort required. Repeat this a few times watching what happens just as your feet leave the ground. Does the needle go from 40 and then up? Or did the needle go from 40, drop down toward 0 and then climb? See if you can keep at least 40 on the dial as you lift your legs.
If this is hard to do, start with lifting only one leg at a time. Then lift one leg slightly before the other leg. One foot on the floor keeps your pelvis against the BPC in order to lift the other leg. This is important because it will help develop the ability to keep your feet in the stirrups when your horse trots and canters.
If this is hard to do, start with lifting only one leg at a time. Then lift one leg slightly before the other leg. One foot on the floor keeps your pelvis against the BPC in order to lift the other leg. This is important because it will help develop the ability to keep your feet in the stirrups when your horse trots and canters.
If this is hard to do, start with lifting only one leg at a time. Then lift one leg slightly before the other leg. One foot on the floor keeps your pelvis against the BPC in order to lift the other leg. This is important because it will help develop the ability to keep your feet in the stirrups when your horse trots and canters. Photo 9. Lift your head off the floor while observing the needle. Is it easier to get the needle to go up lifting your head or your feet? Which one makes the needle go higher with less effort? What happens to your rib cage when you lift your head? Is it stiff or does it soften in front allowing you to press your lower back into the BPC? If this bothers your neck, stop.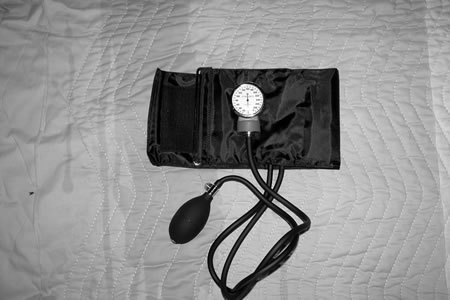
Photo 1
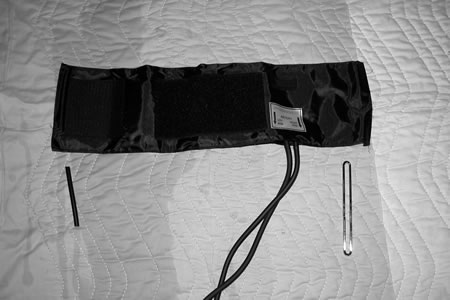
Photo 2

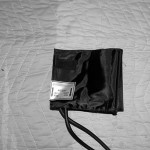
Photo 3
WM-BPC-04
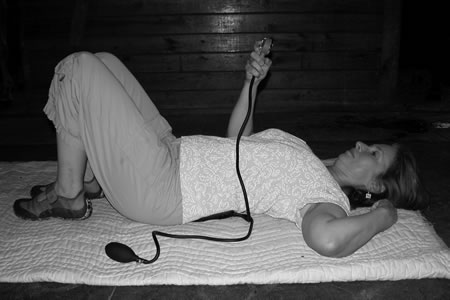
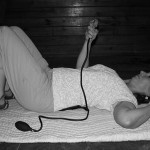
Photo 5

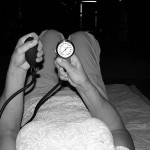
Photo 6
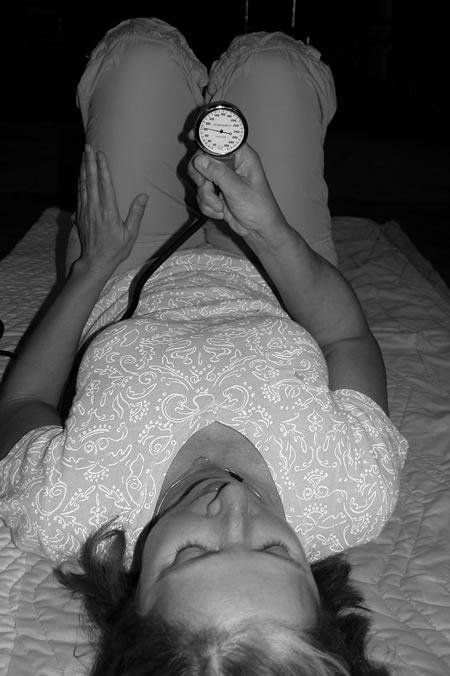
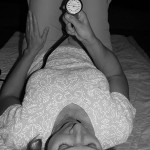
Photo 7
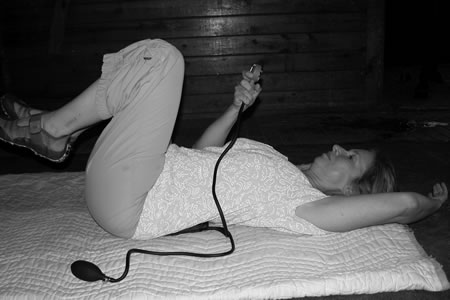
Photo 8
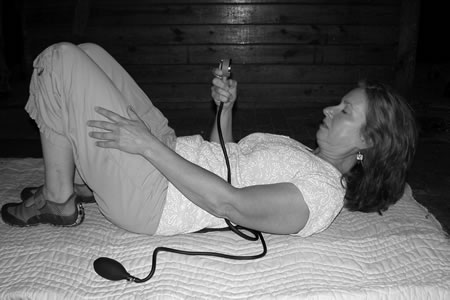
Photo 9
While finding out how high you can make the needle go is interesting, it is not very important. The range at which you will engage the psoas while riding is small. It is more important to be able to maintain a change in pressure on the cuff and make the needle go up with minimum effort. If you cannot breathe normally (unless specifically holding your breath), or if you feel lots of strain, tension and exertion, especially in the abdominal muscles, you are working too hard.
The goal is to be able to isolate the muscles that will engage the pelvis in order to raise the number on the BPC with a minimum of effort. You need to learn to let go of all the extra muscles and isolate the psoas. You want to be able to hold the needle at 50 or 55 and breathe, carry on a conversation with a friend, wiggle your knees and toes, change the tunes on your iPod – anything you want as long as you keep the needle steady at 5,10, 15 and 20 points over baseline.
Most importantly you want to be able to do all this and let go of your abdominal muscles. While tight abs may be a cultural statement about how we think we should look, they are not something we should continuously hold tight while riding our horses. Tight abdominals can actually limit our ability to follow the horse’s movements correctly. When you can let go of your abs completely and make the needle go up at least 20 points then experiment with adding the abs a little at a time and see how these muscles modify what happens to the BPC.
Learning to let your abs go while holding the dial at a constant number and breathing will increase your muscular differentiation. Because your diaphragm and psoas are intimately connected, it is important to learn to differentiate or uncouple your breathing from the use of your back.
Next, hold your breath and make the needle go up and down 5 points in a rhythm. This is differentiating your breathing and psoas in the opposite way from breathing and keeping the BPC constant. You need to be able to rebalance whenever your horse needs it whether you are breathing in or out.
You might think this is a contradiction from the information in my book, Simplify Your Riding. In fact, it is a more advanced breathing technique. In the book I get you to use your breathing to learn how to use your back. “Breathe into your back.” This begins the process of learning to engage the pelvis with psoas and it’s why you are so stable when someone pushes on your back in Power Position. It is the same as the horse letting go of the tension in the area behind the saddle and lightly engaging the pelvis.
Finally, see how high you can make the needle go. When you get this exercise right it will take very little effort to make the needle go to 100 or more without any strain. Use your BPC before you ride, and when riding think of increasing the pressure 5 or 10 points just for a moment and see what happens. I think you will like the rebalancing you achieve with a minimum of effort. Enjoy the summer riding and feel free to contact me if you have any questions.
This article originally appeared in Eclectic Horseman Issue No.37
https://eclectic-horseman.com/mercantile/special-sets/wendy-murdoch-ride-like-a-natural-series/